Saturday, December 31, 2011

New Years Eve!


Here’s a new tradition for us!  Today, we turned our Christmas Tree into a New Years Tree!  We took down all the Christmas ornaments, added festive blue lights, and covered the whole thing in streamers!  We had so much fun with that, we added a wall of streamers we can run through and streamers above our game table, as the plan for the rest of the night is game night!  We’ll celebrate the New Years with either Reykjavik or Cape Verde, depending on how our kids are holding on.  That means we just keep them up till about 7 or 8pm.  Serenity might get to do both, I’m not sure about Donovan.  We used to do Rio de Janeiro new years, at 9pm, but we had such a busy day I’m sure Donovan won’t last that long! 

I love this redecorating idea!  It made for a fun crafty day, and it probably means I won’t leave my tree up until February, which I have been known to do. ;) 

And hey, with this post, I am meeting my New Years Resolution for last year!  I wanted to post at least ten times every month, and I did, if only barely.  I think it’s much easier now that I have the goal of posting most Tuesdays, Thursdays and Saturdays, assuming I have something to say. 

My goal for next year is to lose my dependence on drive-throughs for our sustenance.  I have to at least want the fast food enough to drag the kids out of the car, although I’m fairly sure that will almost never be worth it.  I’m going to try and channel my sister and Abbey, the culinary geniuses in my family =)  Wish me luck!  

I'm off to make party hats!  Woo hoo!

Friday, December 30, 2011

Serenity and Donovan's Christmas Book List

Grandma gave us some Christmas money, so we took it to Barnes and Noble to get some new books to add to our library!  We love going to the library every week for new books, but I just love adding new ones to our collection as well. =) 

Serenity told me she wanted a Fancy Nancy book, a new Backyardigans book, and an Elephant and Piggie book.  She pretty much stuck to that list, with a few additions.  We got Bonjour Butterfly, and since then we've been practicing our butterfly communication =)  She chose I Broke My Trunk from the Elephant and Piggie books, which was fun as we'd never read it, and it is hilarious as are all Mo Willems books.  I would buy all of his if I could afford it, they are so much fun to read!  We read the Elephant and Piggie books together, each taking different characters.  So funny!  We also got Knuffle Bunny Free, which was a little poignant to me, but just still a funny story for Serenity.  We had a Dora book, but when I told her she'd reached her limit and would have to switch out books if she wanted something else, she came across Dinosaurs Love Underpants and gave up Dora for that, which was a big surprise.  Another hilarious book!  We got Donovan a bath book.  I feel a little bad sometimes that we don't buy him much of anything, but we really have every baby toy I consider important and tons of board books.  Plus, he's still at the age where his favorite toy is the water bottle we filled with paper strips. 


It was an awesome shopping trip and an even better afternoon snuggling and reading together!  Or chewing, as Donovan wouldn't let us read the bath book to him without grabbing it to eat. =)  Turns out it squeaks!

Thursday, December 29, 2011

New Years Plan

Well, just as I feared, Christmas made me fall behind on my website =)  I had an amazing Christmas with my family, though, and hope you did as well! 

Today I think I'll share my plan for New Years Eve!  We always celebrate with Serenity, but instead of trying to stay up until midnight (which would totally backfire with our three year old) we celebrate Rio De Janeiro New Years!  Yeah, you can countdown with another time zone and the New Year can start whenever your bedtime is.  We will celebrate with Sprite toasts and fun party hat crafts.  Here's a pic from last year's hat!


Monday, December 19, 2011

Gingerbread Party Supply List

I decided to go ahead and write up my shopping list for the Gingerbread House Party to share.  That way I can be ready for next year, and if anybody wants to have a last minute party this year, maybe it will help!
Here's a link to the party details here.


Shopping list for a Gingerbread House Party:

Michael’s:
Cardboard cake rectangles, cut to 7X10
Edible markers
Cellophane and curly ribbon to wrap the finished product

Grocery Store
4 boxes of Graham Crackers (I used three boxes to make 10 houses)
1 box of sugar cones for trees
1 bag marshmallows for snowmen
Toothpicks

Icing ingredients (I made three batches for this party, and we used up most of that.)
2 heaping cups powdered sugar
4 tbsp butter
1 tsp vanilla
3 tbsp milk

Candies
mini m&ms
Skittles
Mini fruit slices or gumdrops
mini candy canes
Christmassy cereal like Christmas Crunch
Gingerbread Cookie People. Oooh,
(other possibilities include lifesavers, kisses, ribbon candy, mints, Starburst, animal crackers)

Supplies at home:
Glue gun and glue sticks
Serrated knife for cutting crackers
Wet wipes for cleanup
Gallon Ziploc bags for piping

Saturday, December 17, 2011

Gingerbread House Party

December is crazy, I'm so sorry for not posting for a week!  But I have a great one for today, we had a great Gingerbread House Party!  Here are the details!


I invited Serenity's class over to decorate gingerbread houses.  I realized as I was making the bases that I’d never decorated a gingerbread house before!  And just like my mother, the very first time I made ten of them.  Yay for mass production!  Here’s how I set it up:

I built the bases for the gingerbread houses by cheating, as my friend Andrew would say.  Hooray for hot glue!  I figure no one really wants to eat graham crackers that sit out for days anyway =)  I bought cardboard cake rectangles and cut them in half to make 7 by 10 inch boards.  Then I hot glued graham crackers to make the base.  I read a tip from here at One Charming Party about microwaving the graham cracker wrapped in a wet paper towel for 15 seconds, and it definitely made it easier to cut it without breaking the cracker.  I got too lazy for it after a while, so it can be done both ways.  I cut the pattern for my roofline on a piece of cardstock so that I got the angles the same on the front and back.  I cut about a fifth of the graham cracker off the side pieces so that the roof had a nice overhang. 


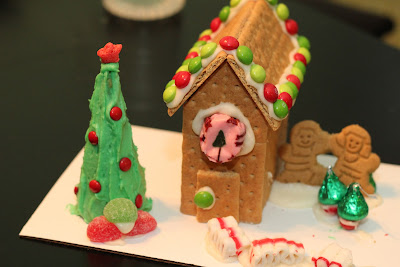
The special details that everyone loved included getting sugar cones and green icing for Christmas trees.  Serenity especially loved this and covered her tree with mini M&M and Skittles ornaments.  And she used mini gummy fruit slices for presents under the tree.  Next, I got supplies to make snowmen out of marshmallows.  Big marshmallows, toothpicks, and edible markers.  Finally, I found little gingerbread cookie people!  Pepperidge farm makes a set of these, and the kids loved adding them to their little houses. 

In addition to all that, I bought a ton of candy!  I think next year I’ll buy different candy knowing what I know now.  With the graham crackers especially, the houses are pretty small.  So the big gumdrop bells, Butterfinger bells, ribbon candy, nougats, and even the hershey’s kisses were a bit too big.  We used a couple maybe each, but they weren’t the most fun.

The best candies were the mini M&Ms, and someone brought little tiny candy balls in all different colors.  They looked just like lights!  Next year I’ll totally buy the M&Ms not in a Christmas mix, they’re cuter with more colors.  The mini fruit slices were awesome, and tiny gumdrops.  The mini candy canes were cool too, but since they came in a box of 60 I imagine I’ll still have some for next year.  Oh, and I nearly forgot the Christmas Crunch.  The cereal made cute decorations, and was lightweight and just the right size =)  I also got Cinnamon Toast Crunch, which I forgot to use but I still think would be cute.


I had the icing ready in Ziploc baggies for piping, and that worked great just like at our Cookie Party.  And green icing in a bowl with popsicle sticks to spread it. 

And that was it! I had some cardboard boxes for people to take home their creations.  Next year I might buy cellophane so they can wrap it and tie it closed with curly ribbon.  I could only make so many trips to Target for things I’d forgotten this year =)  Next year I’ll have a list to work from! 

Thursday, December 8, 2011

Stocking Stuffer: Peg Doll (Dora's Explorer Girls)

Stocking Stuffer Idea: Peg Dolls!

I’m so happy, I finally finished a handmade Christmas present for Serenity!  I kept procrastinating, but have finally switched into “get it done” mode.  So here they are, my peg dolls!

Serenity randomly found on nickjr.com Dora’s Explorer Girls.  Apparently, Dora grows up, moves to the big city, and totally forgets about Boots the monkey.  Very sad.  I will try to forgive her for selling out.  Anyway, she has a great group of girl friends, and Serenity loves them!  There doesn’t seem to be much out there for this show yet, maybe it’s new?  All we’ve seen is the game and the introduction to the girls. I actually like that more, because it means Serenity is making up all the adventures herself!  She tells us which explorer girl we are, and she is usually Naiya.  Then we explore, which ends up being follow the leader as she takes us wherever she can imagine! 

I printed some little pictures of the girls, and Serenity played with these for hours.  So I decided to paint these peg dolls for her.  I did six, for Dora, Naiya, Emma, Kate, Alana, and Serenity the Explorer Girl.  I painted Serenity’s yellow hair, blue eyes, and my favorite purple dress.  I loved Lier’s idea of painting peg dolls to commemorate favorite outfits.  I don’t know that I’ll make as many as she did, but we’ll see.  If Serenity loves them Christmas morning, maybe I’ll be inspired! 
Kate

Naiya's ponytail

Naiya

Serenity in her Purple Girl dress

Alana... technically half these girls are wearing pants... I could try to add a line with a sharpie but I'm thinking it might look weird because of the doll shape...

Dora

Emma

(Process-wise, this is very easy to do.  You just paint it in stages, doing faces, main clothes colors, hair, and then details, waiting for it to dry in between.  It dries super fast though, so I got this all done in one particularly fine afternoon nap.  And I painted over the top with clear modge podge to seal it.  I used a chopstick and a cake tester for the really fine details, the brushes I had weren’t good enough for such small detail. 

Oh, and here's a pic of what the explorer girls should look like =)


Tuesday, December 6, 2011

Making an easy card in Photoshop Elements


If you’re on my Christmas card list and want to be surprised, don’t read this today! =)  The cards just got mailed today thanks to my Advent Calendar. =)  Today’s December Daily is all about making my Christmas card, and getting my three year old daughter to help me mail them! She loved putting on the labels, stamping, and hopping out to the mailbox!  She was a Mail Frog.  No, I don’t know why =) 

I love Photoshop Elements!  It’s really easy to use and you can make fancy cards and layouts.  Here’s how I made ours this year.

Open a new project in the dimensions you want to print.  I print 4X6 photos because then my cards are just 20 cents or so each. 

I took a picture of my kids on the couch.  Then I used the healing brush to kind of spread the couch blue color to the top where you could see my wall.  Just Alt click to select the blue part of the couch and you can smudge the picture until it looks all blue in the background. 

I also adjusted the levels slightly.  In the bottom right task bar you can add a levels layer, and I just adjusted it slightly to brighten it.  Take the far right slider and move it down a bit, take the middle greys one and move it a bit to the left, and the far left one (the darks) and move it to the right a bit.  Just play till you like what you see! 

Then I started adding layers and using a photoshop brush to add the snowflakes.  I added it in several different layers so if I didn’t like one it was easy to delete it.  The brush I used is called Snowtime_by_Crazy_Alice.  I faded some by moving down the opacity. 

The text I used is called Girls are Weird, and it’s available free from dafont.com.  

Then I dropped a ribbon from a Shabby Princess Season Sampler Free Kit and called it good!

Here’s the original picture:

 Here it is after I edited the picture to get rid of the distracting background:


And here’s the completed card:

If you need more help on where to find the tools I mentioned in Photoshop, leave a comment!  I’ll add screenshots, but now I hear the baby waking up and I’ve gotta run!

Sunday, December 4, 2011

December Day Four: Cookie Fest!


Cookie Party!  I just love our annual cookie party.  It’s great to get together with our friends from college and their adorable children, and I get to play!  Try new recipes, crafts, and games.  This year I set up a cookie decorating station for the kids and an apple cider bar.


Here’s the apple cider bar!  I went all out and actually purchased silver polish for the fancy tray my Mama gave me.  Then I went nuts in the grocery store!  Here’s what we had to choose from:
Torani Syrups in Almond, Pumpkin Pie, and Irish Cream flavors.
Butterscotch and Caramel sundae toppings
Maple Syrup
Apple Slices
Butter Pecan and Homemade Vanilla Ice Cream
Cinnamon Whipped Cream

I think my favorite was almond syrup, cinnamon whipped cream, and apple slices.  I also loved butter pecan ice cream with caramel sauce!  Yum!  I found a tip online to keep the cider warm in the crock pot, and it worked perfectly. 


The cookie station was a blast!  Serenity and I had made the cut out cookies the day before (Cinnamon shortbread, mmmm) I put icing into Ziploc baggies and cut the tips off when the kids were ready to design with them.  Even the two year olds could easily squeeze the icing out!  Granted it usually ended up in a big puddle on the cookie, but hey, still delicious. I had a bunch of candies to decorate, but I think the mini M&Ms and the mini chewy fruit slices worked the best.  Oh, and sprinkles of course. 

I made each of the kids a little chef’s hat using this extremely simple pattern.  I just happen to have a bunch of muslin on hand, which I’d purchased to make curtains for Serenity’s room.  Actually this is the second time I’ve bought muslin for that project and used it for something else, I should just keep a bolt of the stuff on hand! =)  
The table for people to put the cookies they brought on.  I put out the veggie tray to balance the sugar a little. =)  Next year maybe I'll think signage earlier, but today I put out green tags for people to write the cookie variety on. 

Saw this in my family fun magazine this month, had to make it cause my husband loves parsley =)

Saturday, December 3, 2011

December Day Two =) Reindeer Food and Pink Decorations!

I probably won't post all my Daily December entries here, but today's projects were so much fun I wanted to share! 


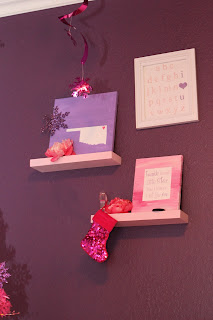
Today’s activity was to decorate Serenity’s room!  I bought a pink tree for her last year, and this year picked up a pink tree skirt and some white and purple felt ornaments to add to her purple snowflakes.  She was so thrilled!  She looked up at me and said, “I’m a big fan of ornaments!” 


She might be out-crafting me!  She asked all day to do ornaments, so I pulled out a craft kit that I’d bought for later in the month.  Then she wanted more!  We read a bunch of library books that I’d requested, and one of them was The Wild Reindeer by Jan Brett.  So we decided to make some reindeer food.  It’s very easy and fun, you just take regular oatmeal and stir in some glitter to make magic oats for the reindeer.  Sprinkle on the lawn Christmas Eve.  We put the finished baggie into the pocket for December 24th so we remember to do it.  She was very serious, choosing just the right color glitter (pink iridescent) and measuring the oats into the bowl and stirring it together.  Such fun! 


Thursday, December 1, 2011

December Daily

December Daily

For the last two years my friend Abbey has inspired me to take part in December Daily.  The basic premise is that you take pictures and scrapbook every single day for the entire month.  I love it because it shows everyday life as well as all the wonderful traditions and fun we have this time of year.  Plus, it gets me out of my scrapbooking slump.  Not so much that I do paper scrapbooks, but digi-scrapping still counts. =)  I just can’t motivate myself to do paper scrapbooking without company.  I need Abbey to live next door, she makes pages nearly every night!  But back to December Daily.

Two years ago I made myself a set of Photoshop templates and used that for each day so that it was quick and easy to make my pages.  Last year I wasn’t quite as diligent, so I was content with just journaling and posting on my personal web page every day.  I think this year I’ll try to get a scrapbook page a day again, and even print it!  However, today is the first day of December and I have no template yet!  But the day isn’t over!  Wish me luck!

Here are a few pics of past December Daily pages, to inspire you and myself. =)   I used Creativity by Crystal's December 2009 paper for all of it, from www.jessicasprague.com. 
Christmas Morning!

Using Cotton Balls for Snow Balls.  Eric made it into a sled. =)

Making a Christmas present for Daddy... I drew the tree outline and she finger painted and added the stickers!

Baking together

I used my JOY stocking hangers as a photo prop... love these pics =)

I love the single big photo... too bad I am incapable of making decisions like that every day.
     

Tuesday, November 29, 2011

A Stocking for Donovan

A Stocking for Donovan          

Well, I’ve had this on my to-do list since before he was born… and I managed to get it done the day before I put up my Christmas Decorations.  Ahh, deadlines.  I work so well with them. =)  I made three patchwork stockings five years ago.  I made three, partially because I already was wishing we had a baby, and partly because I had purchased a set of stocking holders from Pottery Barn that spell out JOY.  (Or YOJ when my husband has his way and mixes up the letters.)  I saved scraps from that sewing frenzy so that I could make more stockings as our family gets bigger that matched the originals.  So here’s how I did it!

I bought a little new fabric for the lining.  I managed the front and back with scraps.  I chose one of my favorite quilt square patterns, pinwheels in this case.  I used pinwheels on his baby quilt and made real pinwheels for his mobile, so now they just make me think Donovan. =)  So I made a pinwheel about 8 inches square, and then just added strips where I needed it to be bigger.  With the originals, I made patchworky blocks about 12 inches by about 18 inches, but this way there was less waste, and it still looks nice and patchy to match the originals. 


So after sewing  a top that was big enough to match my stockings, I cut out a backing, and then two more pieces to be a lining.  Sew the fronts together, leaving the top open.  Sew the linings together, leaving the top open and a hole on one side to turn the finished stocking.  Then you put the two pieces together, sew around the top, and then turn through the hole you left in the lining.  I never sewed this shut, although you certainly could, especially if you put lots of little things in the stocking.  I’ve never lost anything though.  =) 

The original three are pretty too, but I think Donovan’s is my favorite =)  Serenity’s stocking is a log cabin pattern, which was my original favorite.  I’d always wanted to do a log cabin =)  Eric’s is just lots of triangle blocks and nine patches.  Mine is a pretty pointy star.  I wished I’d added some of the ivory to it to make it pop more. 


I just love sampler-type quilting.  I’ll have to share my tree skirt soon =)