Showing posts with label nursery. Show all posts

Saturday, October 29, 2011

Lullaby Art: Fall Pinterest Challenge!

It's that time again, another Pinterest Challenge from Young House Love and Katie Bower.  It's such a great idea to take all that pinning and actually make something for a change! 
My Version


I saw this beautiful painting that someone had done for a birthday party and knew it would be perfect for Serenity!  The colors were just right for her room, but I wanted to make it my own by using the lyrics from Twinkle Twinkle.  That is my go-to lullaby for Serenity.  I must have sung it to her ten thousand times, sometimes for an hour straight when she was tiny.  I'm not sure why, but it always reminds me of her now, and I sometimes hear her singing it to herself over the monitor.  =)

I have plenty of pink paint on hand, so I just took a light and a dark, plus a little bit of white paint.  I used a big, old house-painting brush because I wanted to be sure and see the brush strokes, and so I could cover the canvas with a minimum of fiddling.  I just started with the light pink, and when the canvas was mostly covered, dipped into the dark and added a few swipes of that, and then dipped in the white to finish up.  No washing brushes, quick and easy!

Then I went into photoshop to type out my lyrics.  I used the font Girls are Weird, and chose shades of lavender for my colors.  Print on some nice paper, and glue it down!  Then I just set it on one of her ledges to add it to her wall collage!  It's perfect, not only for the song, but because we seem to have quite a star theme going on in her purple bedroom.  To see more of her room, look here.  Or here.


I'm going to add a sound button to the back with my voice singing a little bit of Twinkle Twinkle, so it will have even more personal meaning. 


If you want to know how to make some other things in Serenity's room, check out my Wall Vase for a ThreeYear Old post.  That one still makes me happy!  Or her Oklahoma Art.

Friday, July 29, 2011

Donovan's Nursery

Donovan's nursery is finally coming together!  And he's just seven weeks old =) He won't be sleeping in it until he's too big for the cradle though so I'm not terribly worried that it's taken this long since it had to be built from scratch!  Yesterday I found the perfect Curious George wall decals that I thought had been discontinued from Pottery Barn Kids, and that gave me just the impetus I needed to finally start hanging stuff up in there.
In case you're wondering, yes the bed is backwards.  Serenity keeps climbing in it whenever I'm not in the room.  This way at least she's not trying to climb up the drop down side. 


I opened my brand new Silhouette and used it to cut out the letters for his name, and then I arranged the kites, Curious George Decals, and name letters on the ceiling.  I love how the ceiling angles, it makes it seem like the kites are flying right overhead! Look here for the tutorial on how to make the kites =)

I also dressed a little set of shelves in the hallway just inside the door of his room with all the adorable Curious George stuff I got from my wonderful shower, along with the personalized blocks and the awesome scrapbook with photos of our wonderful friends in it!


Now I just want to make a little reading nook in the corner, and buy a chair for nursing when we move back upstairs.  Much better!

Sunday, May 22, 2011

Pinwheel Pinwheel Spinning Around...


Waaay back when we were in a serious sleep training mode, we bought a mobile for Serenity’s crib that had a remote control option.  It didn’t really help her sleep but it sure beat having to wind up the mobile all the time.  It was fish themed though which really doesn’t go with my storybook/Curious George plans for this baby.  So I made something to replace the fish!  Pinwheels!  These are all over the place now, and so easy to make.  I just used the fast2fuse because that’s what I had out, although a lighter weight fusible interfacing would probably have been better.  This worked though and I was in a “get it done” mood.  Strange what the doctor telling you, he could come any day now, does to your brain. =)  Then you just cut along the diagonals slightly past halfway from the corner toward the middle, and fold up every other side to the middle.  Easy peasy!  And I think it will be cute once it’s installed!  I made a six inch, a 5.5 inch, and a 5 inch pinwheel... mostly because that is the size I could get from my remnants of interfacing. =) 


Friday, May 20, 2011

Kites for the Nursery!


Baby Project Day!

Thanks to my very sweet sister I got a nice long craft time today!  While Serenity was off having a play day with her cousins, I finally made the kites and pinwheels for the new baby’s decorations!  I probably won’t install them until the room is 100% done, but at least I know now which room it will be!  Makes it so much easier to feel like working on things when I can finally visualize how it will work!


Here are the kites I made!  I used fast2fuse, which is a two sided interfacing that is thick enough to have a little weight.  That way it won’t flop too much up there, and I won’t have to make poles or anything like that to give it structure.  Basically I just sewed up 6.5 by 11.5 rectangles to 6.5 inch squares, and then ironed it onto the fast2fuse.  (It took forever to iron because I had to use a press cloth, both because my iron is a little sticky from an unfortunate felt ironing incident, and because I was using minkee.  After that, I cut the fabric to fit the kite shape (16 inches tall, 11 inches wide, 5.5 inches from the top to the center of the diamond.) 

Then I used twine and scraps of fleece and fabric for the tail!  I love it and I’m so excited to hang it!  Hopefully with some nice vinyl letters…  oh yes did I mention I ordered a SILHOUETTE!?!  Sooo excited!

Saturday, April 9, 2011

Purple Room Stage One!


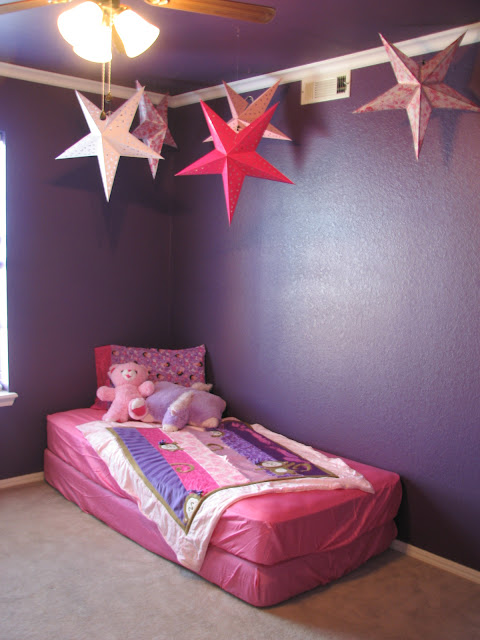
We had moving day!  Serenity is officially moved into the purple room now.  She loved every step of it, from discovering the new pink sheets that I’d purchased for her bed (from Pottery Barn Teen, I love that I could just order fitted sheets since that’s all I really needed.)  to the crazy new collection of star lanterns on her ceiling!  She particularly liked the one with the moon cutouts, and then she said the flower one was her favorite.  I may eventually light these, but that is still a major debate as I don’t want to deal with a ton of cords all over the place, especially not near her bed.  I still need to hang her newly painted name letters over her bed but under the stars, but it’s a good step! 


Here is the bed all made… or as made as I imagine it ever will be.  Her monkey blanket is here, as well as the Dora pillow I made while waiting on construction to finish.  I also added her pink teddy and purple unicorn because they matched the colors.  But in case you think that’s just something I do, let me assure you that my daughter refuses to go to bed with non-matching things.  If she decides it’s a night to sleep with her yellow duck, Quack, or her blue teddy, we will be getting out her flower pillow and butterfly blanket, which have primary colors in them.  She is completely obsessed with matching, which is hilarious and fun!  

Secret, Clean, and Empty! All fantastic words =)

Today was a fantastic day!!!  I got to DUST!!  Dusting is always bizarrely satisfying for me, but between nesting and pregnancy impulses and the fact that the dust was an inch thick due to the construction, I was in high heaven!  Dad finished Serenity’s new secret room that he was building in the little attic space behind her closet, so we finally started emptying the purple room to get it ready for her!  Eric and I dusted, vacuumed, and I directed traffic as he moved all the junk that had collected in that room to slightly more proper locations. 

The new secret room is amazing by the way!  It’s even better than the first one!  The entryway is higher so I don’t have to crawl in, it has bench seating on one side, and there is a window!  Dad truly outdid himself this time.  She loves it already!  Her initial reaction to the room was to jump all over it yelling, “I’m bouncing in my secret room!!!!!!” (All those exclamation points are necessary, believe me. =)  We’re trying to call it the hideaway to distinguish it from the old secret room, but I keep slipping.


Even Serenity helped dust!


View of the secret room, and the closet doors are gone!


Nicely Painted

All the mess Eric had to move...
And so, another checkmark on the to-do list!  Oh, and while we had the white paint out, I took down the closet doors so we could do touch up there too!  So make that two checkmarks! Tomorrow I will be able to post about decorating!!! Or maybe even later on tonight ;)

Monday, January 17, 2011

DIY Flower Box Cornice


DIY Flower Box Window Cornice

This was a fun and simple project!  With the upside-down garden, I knew I wanted to have lots of flowers, and using a window box for a window cornice seemed perfect.  I made a simple box, using the cute trim molding on three sides so the back side would be flat.  There are little one by one scraps of wood at the corners to give me something to nail into, and one board in the middle to help keep it sturdy.  Then the back piece has a small rectangle cut out of it so that I can hang the box easily on a one by two that is screwed to the wall!


After filling the nail holes with wood filler and painting, I did the arrangement.  I stuffed the box with styrofoam.  It was very tight so I didn't worry about gluing in case I wanted to reuse it later elsewhere.  I purchased lots of silk flowers after they went on sale, you can almost always find some seasonal flowers at a good price, plus the ones from the dollar store work fine for something like this.  I was especially glad for the big sunflowers as filler, but I think the prettiest are the little sprays of blue and red flowers that draped down so nicely.  Then I just hung it up!  It’s great for color and detail, and would be nice as part of a little play garden for someone whose nursery is right side up =)  


Monday, January 10, 2011

DIY Wall Bookshelf

Here are the shelf plans I promised in the post on Serenity's Nursery!
All right, here are the measurements on the shelf!

The overall size is 48 inches wide by 39 inches high. 

The top and bottom boards are one by fours, which means they are actually more like three-quarters of an inch by 3 and one half.  My dad says it’s always very important to measure the boards to see what size they actually are, not what they say they are on the label.  These one by fours hang over the side a bit, because I liked the way that looked!  So they are 48 inches wide.  Then my dad cut a dado out of the back, which is a little notch a quarter of an inch square, so that the back nests inside these boards.  We would have done this for the sides as well, except I picked a fancy trim board with a wavy edge and a vine pattern that I didn’t want to cut into. 
Here you can see the Dado and the vine design on the trim board I chose, which I got at Lowes.

The back board is cut to 44 ½ wide by 37 ½ tall.  My fancy boards that I used for the sides are ½ and inch deep, which makes 45 ½ the size of the main part of the shelf, and gave me about 1 ¼ inch overhang on either side from the top boards. 

The interior shelves are placed so that the distance between the shelves is 11 and ¼ inch for the top two, and 13 ¼ inch for the bottom one.  I find the 13 ¼ inch shelf the most useful, because those really big books just fit better faced out than in my other bookshelf.  If I built another, I might make it larger and have two shelves at the 13 ¼ size and only one at the 11 ¼ size.  Definitely no smaller, otherwise it’s a pain to get the books in and out! 

The interior shelves are 1 by 4s, cut to 2 ½ inches deep so that they are just slightly narrower than my two trim boards that make the sides.  2 and ½ deep by 44 ½ wide. 

Then we made little side pieces to hold the dowel rods in place.  I used ½ inch dowel rods  These pieces are one by fours cut to 4 ½ inches tall for the smaller shelves, and 6 inches tall for the larger shelf.  They are 2 ½ inches deep, and I routed the top outside corner a bit.  We cut two holes near the outside edge, about two inches apart and near the top of the little boards as pictured. 

I gave the dowel rods a coat of paint, skipping the part that would go inside the little wood pieces.  We used wood glue to secure them in to the side pieces, and then I finished painting them so that all we’d have to do after the shelf was together would be touch up.

We also gave the back a coat of paint, skipping where the shelf would go so the wood glue we used would stick well.  It was a lot easier to just have to do touch up after the shelf was assembled, with the dowel rods in the way! 

We used finish nails in a nail gun to assemble the pieces, and of course wood glue.  After we filled the tiny holes with wood filler and painted, and now I can’t even see any nail holes at all!

To hang the shelf, we used screws right into the wall studs.  I used brass so they didn’t show up much at all against the yellow paint, and I never notice them once the books are in place.  We wanted to be sure it was very sturdy, since the weight of the books and wood is significant!!!  This part is definitely at least a two person job!  

I hope this helps, and I would love to see pictures if anyone uses this tutorial!

Wednesday, January 5, 2011

Serenity's Storybook Nursery

I'm feeling a need to post more about Serenity's nursery, because it's about to change drastically with the arrival of a new sibling in May!  So here are the details of her nursery that I created just for her.  I already posted about her storybook art that I made here.  Here are the rest of the ways I decorated her original nursery.

Here's a pic of me with the storybook art at about 6 or 7 months... yeah, pretty sure I already look this pregnant this time at more like 4 months...
My dad and I built this bookshelf, inspired by a Pottery Barn shelf.  We decided to make our own for two reasons, first of all I needed color anywhere I could get it in this room, and I couldn't justify paying 100 dollars for Pottery Barns shelf when I would have to paint it immediately.  And then we just like building things together. =) Plus, we made ours bigger! I used it to hold lots of storybooks, especially those I thought we wouldn't read until she was older, and those that were too big to fit on her regular bookshelf.  I will try to post plans for that shelf if anyone is interested in how we made it!  Just a quick note, I find the biggest shelf by far the most useful, having room to face out all the odd size books really help!  Also note that my sister got me lots of great vintage Raggedy Ann books that were just adorable for this.

The big blue rocking chair was my major baby purchase, and worth every penny as I slept there way more often than I should have.  It also added some nice color, and I made an Irish Chain quilt with my mother to give it even more!  My Mom appliqued all the butterflies, and I used a rainbow of colors.  Ok, rainbow minus orange.  I have my quirks.
I debated the pattern for this quilt FOREVER but decided on the chain because it made me think of rainbows =)

We had this brown bookcase that was a nice color to go with the crib that we inherited from my sister.  I added the colorful baskets that worked great for storing all her clothes.  Yeah, no hanging tiny baby clothes, I'm way too lazy for that.  Stuff them in the baskets, occasionally consider folding... and that does it.

The bumper is a pottery barn alphabet one that I begged my sister-in-law Kelly to send me when my nephew was done with it, as the letters and colors were just perfect for my plan.  =) 

Wednesday, November 3, 2010

DIY Nursery Art: Serenity's Storybook Nursery

Since my first pregnancy seemed to take FOREVER, I had plenty of time for lots of crafting!  I settled on a storybook theme, figuring it would work for a boy or a girl and I just couldn't wait twenty whole weeks to start making baby stuff.  One of the first projects I tackled was this easy canvas wall art.  We were living in an apartment that we didn't plan to paint, so the nursery needed lots of color!  Here's how I got it:


I wanted alphabet wall art that fit my storybook theme, so I chose a different fairy tale or character from my favorite books for each letter of the alphabet.  Let me tell you now, some letters are easier than others.  I almost gave up on I and Q. But first, here is how I did it.  The process is very simple.  I just found coloring books or free coloring pages from all over the internet for each section of my pictures.  Then I held the picture and the canvas up to the window and traced it in pencil onto the canvas.  I printed the letter in a font I liked (I used Dolphin I believe) and traced it as well.  Then I used bright acrylic paints to fill in the colors.  Then for the challenging part =)  I traced around all the pencil lines with a black sharpie.  Veeerry carefully.  I went through several sharpies, they get dull after a while! 

I bought 3 canvases in size 18 by 20 and 3 in 20 by 20.  I really liked the square ones best but I got a great deal on the 18 by 20.  I put four or five letters on each one.  I planned to hang them two across by three down, so I got out my colored pencils and planned the colors so that the same color was never next to it.  I also made it work in case I decided to hang it in one long line, which I have also done. =)

Here is the A-D canvas.   You can see that I didn't want all the squares to be the same size, so I mixed it up.  Some are ten by ten, Curious George is ten by twelve, and so on.  Graph paper and colored pencils were my best friend on this project =)


And then here is the list of what each letter stands for (with extra options in parenthesis)

A: Alice in Wonderland (Ariel)
B: Babar (Berenstain Bears)
C: Curious George (Cheshire Cat, Care Bears, Corduroy)
D: Dragon (I was thinking of the one in the Paper Bag Princess, but Serenity thinks it's a pic of a dinosaur anyway. =)
E: Eeyore (Eloise)
F: Fairy (We used Tinkerbell here because we had lots of cute T choices.  Also considered Fish for Rainbow Fish)
G: Gonzo (Had to have a muppet.  Also the Genie from Aladdin)
H: Harry Potter
I: Inigo Montoya (This was the HARDEST!  I also considered Incredibles but they aren't really from a book...  Anyway, to get this picture I took a picture of Captain Hook and modified it to look more like the guy from the movie.  Princess Bride is a great book at least =)
J: Jemima Puddleduck (Jasmine.  I didn't want TOO many Disney Princesses on here though, and Beatrix Potter rocks.)
K: Kanga and Roo (Ditto with too many Winnie the Pooh characters, two was pushing it but I didn't have a better K and I HAD to use eeyore =)
L: Little Mermaid (Little Bo Peep)
M: Madeline (Mulan, Mouse from the Give a Mouse a Cookie book.)
N: Nancy Drew (Also hard to get a good pic of, I was proud it turned out slightly recognizable. Thought of Narnia but how do you draw that?)
O: Oz (I can't believe it now, but back then I didn't know Olivia the Pig!!!  So much easier to draw!)
P: Paddington Bear (Peter Rabbit, Pippi Longstocking, Peter Pan, Puff the Magic Dragon)
Q: Queen Lucy of Narnia (Cheating a little bit, but I just don't like the Queen of Hearts! And this way I worked the Narnia books in.)
R: Raggedy Ann and Andy (Rainbow Fish)
S: Snow White (Sam I am)
T: Thing One and Thing Two (Tikki Tikki Tembo, Tinkerbell, Tigger)
U: Unicorn (From the Last Unicorn... Hence the purple mane and tail, although that's just in the cartoon version.)
V: Velveteen Rabbit
W: Wild Things
X: X-Men (Also a stretch.  My friend Jack drew versions for me =)
Y: Yertle the Turtle
Z: Zazu