Showing posts with label tutorials. Show all posts

Monday, April 4, 2011

More Superhero Photo Backdrops

Photo Board:
The second photo backdrop was a little more complex to make!  My dad and I bought a huge piece of plywood and painted a picture of all the Super Readers in their Why Flyers.  Then my Dad, using his jigsaw, carefully cut out oval shapes for the faces of each Super Reader.  He added hinges so that we could put the faces back.  (that was in case there were pictures with fewer than four children, so there wouldn’t be creepy headless Super Readers.)  The windows turned out to be my daughter’s favorite part, all the little kids preferred the front side of the photo board to the back. =)  Dad built a simple frame out of two by fours on the back to make it more stable, and added feet to make it stand up.  It was a big hit!  And it’s still hanging in my backyard, and she still loves visiting the Super Readers =) 

** Here’s my best tip if you want to have your own photo booth for young kids, set up a mirror so they can see what they look like.  They were much more excited to poke their head through the window when they could actually see themselves as Superheroes!  For more party details, check out the original post for the Super Why Birthday!

Superhero Photo Backdrops


I still have more details to blog about Serenity's Princess Presto Tea Party!  

I made two different kinds of photo backdrops for this party.  I’ll start with the simplest first!  I bought a big dropcloth from the hardware store and painted it to resemble the backdrop that comes on whenever the Super Readers transform into their superhero selves.  I chose Wonder Red’s backdrop and Princess Presto’s backdrop, as they match the party colors best (pink, purple, and red!)  It was pretty easy to paint.  The dropcloth soaks up so much paint it’s a really good idea to prime it with cheap white paint first.  Then I just took regular acrylic paint and painted the swirls and spirals!  For Wonder Red’s little purple spirals, I found it easiest to paint those on a separate piece of cotton duck cloth and then hot glue it to the background.  Much easier than trying to paint around them =)  I like using a roller whenever possible! 

To hang them I just stapled a one by to the top of the back and draped it over a fence so it’d hang to the ground to highlight my little superheroes!  They LOVED posing in the costumes and capes!  To read more about all the supplies I collected check out the original Superhero Tea Party post!


Tuesday, March 15, 2011

Lemons!


Lemon Tree!
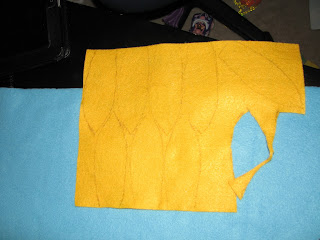
One more addition to Serenity’s felt tree for now… lemons!  I had some leftover yellow fleece from Serenity’s Care Bear costume, so I made some lemons.  I made a little pattern myself… and it took a few tries before I thought they were very lemony.  The first one was too small and ball-like… I think because I cut four pieces of my pattern that was shaped more like half a lemon. =) 

The second was too big and still kind of round like…

And finally, I ended up with this shape, which was my favorite.  Although I know in real life lemons come in all kind of crazy shapes.  Here’s a pic of the pattern, I used four pieces.  It’s about 6 inches long, three high.  The stem is sewn from the fuzzy side of the velcro, just like the pickable strawberries and green beans.   


I sewed little squares of Velcro to the tree, so they are pickable!  There are six lemons, but Serenity picks them almost as soon as I put them on the tree so the picture here just has four =)  We’re having such fun!

To see the whole tree tutorial, go here.  
Tutorial for the leaves here.

Sunday, March 13, 2011

Felt Tree Part Two!


Spring in Serenity’s Garden!
Well, my peach tree started sprouting leaves, so I got busy making leaves for Serenity’s felt tree as well. =)  I attached them with snaps so that we can take them off, exchange them for flowers or fall leaves. 


I cut simple shapes out of a few shades of green felt.  Part of the point of the project is to use up some of my stash so I used what I had =)  Then I pinched each leaf to give them some dimension and stitched them together in groups of five.  Then I sewed snaps on the tree!  Easy as that, we get spring =) I used about 70 leaves.  It could maybe use more but Serenity ran off with it, so I guess it works for her. =)   


To see the instructions for the tree itself, check out Felt Tree Part One!

Saturday, March 12, 2011

Felt Tree!


Here is the newest addition to our felt garden… A tree!  At the moment it is a winter tree, as it has no flowers or leaves or fruit yet. =)  At least that’s how I explained it to Serenity, who immediately wanted to decorate the tree.  She ended up using her jewelry. =)  And carrying it around the house, so I’d say it was a big hit! 

It was pretty simple if a little time consuming to make.  First, I drew a simple tree shape.  I pinned the pattern to my fleece and sewed around it.  I just made the top part of the tree to start with, in the hopes of making it easier to stuff.  After that was sewn, I stuffed each branch with those gigantic pipe cleaners, so that I could shape the tree a little bit, and filled it with stuffing.  (Fold over the ends of the pipe cleaners so no sharp points can poke you!)  After I did that, I could tell that it was still going to be a bit too floppy, so I slid some bamboo poles into the two branches that I wanted to remain the most upright.

The trunk part is stuffed with a pool noodle from the dollar store.  One of the little poles that goes up into the tall branches is in the middle of the noodle, so the whole thing stands fairly tall.  I also added a roll of pennies to the bottom of the inside of the pool noodle to give it a little weight.  It’s nearly as tall as my daughter, about 36 inches.  The trunk is 20, the branch section is 16.  It took 2/3 of a yard of fleece fabric (folded in half) for the top, and the trunk is about four inches wide.  I

For now we just plant it in our felt garden, which holds it upright fairly well.  I may need to build a stand so we can move it around more easily, it definitely doesn’t stand all by itself. 

Next job is cutting out about a hundred leaves, and maybe making some blossoms. =)  Hand sewing all the way, not my fastest skill. 

Tuesday, March 1, 2011

Bird Wings

Well, in my continued efforts to empty the half finished projects from my craft closet, I made Serenity a set of bird wings!  She went through a phase where she’d run through the house flapping her arms and saying, “I’m a bird, I’m a bird!”  So I thought this would be a good addition to our dress-up collection.


I made them very simple.  I just cut out a basic bird wing and tail shape from fleece, and then cut out a lot of feathers from craft felt.  I went with rainbow for the coloring =)  It took about ten 8.5 by 11 sheets of felt, I got nine or so feathers from each sheet. 


I sewed the feathers on in rows starting at the bottom, just a simple straight stitch across the top of each feather, leaving the bottoms to flap.  After I got all the feathers on, I went back and put a little dot of tacky glue in under the center of each, just to hold them in place a little more.  I want them to flutter but still hold the basic wing shape. 

The last step was adding loops of elastic to the wrist and a longer loop (made from a 32 inch piece of elastic) to make backpack-style loops in the center of the wings.  (I made butterfly wings with rainbow fabric this way, I saw it at This Mama Sews Stuff)  I trimmed the top where the feathers didn’t quite cover the fleece so the top curves a bit more than in the original picture.  I may go back and add ribbon or binding to finish the top a bit more, or I may just leave it as is.  Should be fun!  Today Serenity was doing a little dance that went “wiggle, wiggle, flap!” So hopefully she’ll enjoy adding real wings to her flapping. =)  

**They are just a little bit big, which will probably be good for her to get to use them for a while.  I could make them a bit smaller by moving the wristlets, and I may do that.  If I can get her out of them.  

Monday, January 17, 2011

DIY Flower Box Cornice


DIY Flower Box Window Cornice

This was a fun and simple project!  With the upside-down garden, I knew I wanted to have lots of flowers, and using a window box for a window cornice seemed perfect.  I made a simple box, using the cute trim molding on three sides so the back side would be flat.  There are little one by one scraps of wood at the corners to give me something to nail into, and one board in the middle to help keep it sturdy.  Then the back piece has a small rectangle cut out of it so that I can hang the box easily on a one by two that is screwed to the wall!


After filling the nail holes with wood filler and painting, I did the arrangement.  I stuffed the box with styrofoam.  It was very tight so I didn't worry about gluing in case I wanted to reuse it later elsewhere.  I purchased lots of silk flowers after they went on sale, you can almost always find some seasonal flowers at a good price, plus the ones from the dollar store work fine for something like this.  I was especially glad for the big sunflowers as filler, but I think the prettiest are the little sprays of blue and red flowers that draped down so nicely.  Then I just hung it up!  It’s great for color and detail, and would be nice as part of a little play garden for someone whose nursery is right side up =)  


Thursday, January 13, 2011

Superhero Capes!

For Serenity's last birthday, her Princess Presto Tea Party, I made superhero capes for all the kids!  It was a lot easier than I thought it might be, and I wanted to share a few tips and the design I settled on for them. 


 Here are the general dimensions:
The bottom is 21 inches wide (22 cut), with a gentle curve at the bottom because I wanted it to look wavy.
The length from the bottom of the cape to the neckline is 23 inches (24 cut)  At this point, the cape is 12 inches wide.  So it's a triangle with a rounded bottom. 
Then the neck, which I just eyeballed, is about six inches if you measure from the top of the cape where the velcro is to the neckline.

The general shape is the most important, I sized it so that I could get as many capes as possible from my 60 inch wide fabric. 

The capes are reversible, and I used reds, dark purples, medium purples, lavender and hot pink.  I just sewed two pieces together, trimmed the corners and clipped the curves,  turned it right side out, ironed it and ladder stitched them shut.  For my daughter's, which I fancied up a bit, I top stitched it.  This definitely makes a big difference, but I didn't have the time and energy to do it for all 14 that I made for the party!  Then I just sewed velcro, one to the top right neck piece, on to the bottom left. 

The star and letter applique was very simple.  I just printed the biggest star I could make in photoshop, and the letter S in the Dolphin font, which is one of my favorites.  I used iron on steam-a-seam, and top stitched it for security.  **** I did this before I sewed the two pieces of the cape together!  The capes also look good with big circles or Superman shaped diamonds. 


Part of the party fun was getting to decorate the capes!  I had a ton of sticky-back foam, foam letters, and other stickers for this purpose.  The kids loved them!  And they could add masks, wands and other various accessories to finish their superhero costumes.   I also set up two canvas backdrops with appropriate super hero designs for photos!


Here are some other pages for superhero capes.  I love the applique designs at Puking Pastilles, she even has a SuperWhy design!  And her diagram was helpful for the start of my pattern, although I did a different shape.  I like my pointed corners, I couldn't explain why. =)

And Martha has some more ideas for superhero designs.

Monday, January 10, 2011

DIY Wall Bookshelf

Here are the shelf plans I promised in the post on Serenity's Nursery!
All right, here are the measurements on the shelf!

The overall size is 48 inches wide by 39 inches high. 

The top and bottom boards are one by fours, which means they are actually more like three-quarters of an inch by 3 and one half.  My dad says it’s always very important to measure the boards to see what size they actually are, not what they say they are on the label.  These one by fours hang over the side a bit, because I liked the way that looked!  So they are 48 inches wide.  Then my dad cut a dado out of the back, which is a little notch a quarter of an inch square, so that the back nests inside these boards.  We would have done this for the sides as well, except I picked a fancy trim board with a wavy edge and a vine pattern that I didn’t want to cut into. 
Here you can see the Dado and the vine design on the trim board I chose, which I got at Lowes.

The back board is cut to 44 ½ wide by 37 ½ tall.  My fancy boards that I used for the sides are ½ and inch deep, which makes 45 ½ the size of the main part of the shelf, and gave me about 1 ¼ inch overhang on either side from the top boards. 

The interior shelves are placed so that the distance between the shelves is 11 and ¼ inch for the top two, and 13 ¼ inch for the bottom one.  I find the 13 ¼ inch shelf the most useful, because those really big books just fit better faced out than in my other bookshelf.  If I built another, I might make it larger and have two shelves at the 13 ¼ size and only one at the 11 ¼ size.  Definitely no smaller, otherwise it’s a pain to get the books in and out! 

The interior shelves are 1 by 4s, cut to 2 ½ inches deep so that they are just slightly narrower than my two trim boards that make the sides.  2 and ½ deep by 44 ½ wide. 

Then we made little side pieces to hold the dowel rods in place.  I used ½ inch dowel rods  These pieces are one by fours cut to 4 ½ inches tall for the smaller shelves, and 6 inches tall for the larger shelf.  They are 2 ½ inches deep, and I routed the top outside corner a bit.  We cut two holes near the outside edge, about two inches apart and near the top of the little boards as pictured. 

I gave the dowel rods a coat of paint, skipping the part that would go inside the little wood pieces.  We used wood glue to secure them in to the side pieces, and then I finished painting them so that all we’d have to do after the shelf was together would be touch up.

We also gave the back a coat of paint, skipping where the shelf would go so the wood glue we used would stick well.  It was a lot easier to just have to do touch up after the shelf was assembled, with the dowel rods in the way! 

We used finish nails in a nail gun to assemble the pieces, and of course wood glue.  After we filled the tiny holes with wood filler and painted, and now I can’t even see any nail holes at all!

To hang the shelf, we used screws right into the wall studs.  I used brass so they didn’t show up much at all against the yellow paint, and I never notice them once the books are in place.  We wanted to be sure it was very sturdy, since the weight of the books and wood is significant!!!  This part is definitely at least a two person job!  

I hope this helps, and I would love to see pictures if anyone uses this tutorial!

Sunday, October 24, 2010

Moses Basket for a Doll =)

Moses Doll Basket Tutorial

Well, last night I got the urge and just couldn’t resist it.  You know the one, when you’ve been thinking about making something and the idea finally clicks!  So at 10pm I started crafting, and this is what I came up with.

I’ve been seeing cute baby doll bassinets everywhere, and when my daughter got the first baby doll she’s shown any interest in, I wanted to make one for her, of course!  But I decided I wanted mine to look woven, more like a Moses basket than a fabric bassinet.  So I decided to make it like a braided rag rug!  I love how it turned out =)  As an added bonus, I had all those yellow fleece scraps in my stash, so I didn’t have to buy anything!!  It took around three hours start to finish. 

First, I cut a bunch of two inch strips from my fleece, about 12 yards.  This was enough to make the base and the sides of the bassinet.  I made about two more yards of two inch wide strips for the cover side. 

Then I sewed the strips together into three long strips.  I sewed at an angle, like you do for binding, so that there wasn’t as much bulk in the braid. 
Sorry for the bad pic, but believe me, there is a wrong way to do this, and I did about all of them.  =)

Then you braid them together.  I tied my strips to Serenity’s Yookidoo (this is a seriously awesome toy btw =)  and started braiding.  I discovered quickly that since I sewed the long strips, it helped if I sort of balled them up to braid.  Otherwise things got seriously tangled.  You could also braid short strips, then attach another strip, then braid, and so on, but I don’t like to go back and forth to the machine that much.  As I was doing it I thought it could be a seriously awesome Rapunzel braid too. =) 

Then I just started making the basket.  The base is exactly like an oval rag rug.  I used yellow Perl cotton to lace it together, which was perfect because it didn’t show.  But really I used it cause that’s what I had.  This project started at 10pm, so I worked with what I had! You lace it just like shoes, through the loops of the braid.  I went under from the back, up through the top.  Check out these diagrams in case that sentence makes no sense.  http://www.craftown.com/instruction/rugs.htm.  My strip started at 10 inches, and then I went around in an oval until it was about 15 inches by 9 or 10 inches. 

Then I started making the sides.  To get them to angle up, I used a ladder stitch to connect the base to the sides.  I’m still going around the oval here, I just switched my stitch. Then when I went around once, I kept going with the normal lacing stitch until it was the height I wanted.  I used about 9 yards of braid, which took the 12 yards of strips to make. 

Then I added the little section over the head.  I added in a new braid strip, weaving in the ends of the knot back into the basket.  Then I went around as far as I thought it should go, and then folded it back on itself to make the little arched top.  Hopefully the picture explains that better =)  Then I attached a little bow to where it connected to the basket, partially because it’s cute and partially to conceal the connection. 

Then I just had to make some handles!  I used one inch strips for these braids, and tacked them on starting right next to where the arch ended.  The handles aren’t quite centered because I figured the weight would be more on the head side. 

So there it is!  A Moses basket for your baby dolls =)  Serenity has been putting Rose to bed all morning.  Thanks for the doll Aunt Jan!!  =)  Let me know if anyone has questions!  I’d love to hear that someone actually used this tutorial =)
Of course, Rose needed covers and a pillow too =) So we used the scarves we dyed =) 

Thursday, October 21, 2010

DIY Felt Pumpkin Game

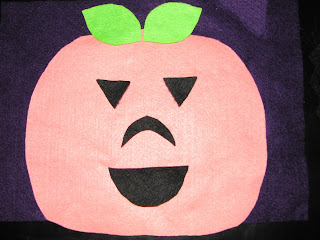
I saw this great pumpkin game at thecraftingchicks and immediately had to see if Serenity would like it.  She loves it!  All it took was a little bit of felt from my stash, cut into a pumpkin shape, and then a variety of shapes for eyes, noses and mouths.  Then I made several samples, took pictures of them, and then gave them to Serenity to see if she could duplicate the pictures.  She says "I will decorate this pumpkin!" And she managed to do every one!  It's a great reinforcement for shapes, and a really fun game.  Here are pictures of the pumpkins I made her, and one of her "decorating" her pumpkins. =)  It was a hit, and took me maybe five minutes to make!  You could do it with construction paper or craft foam if you didn't have the felt on hand.