Tuesday, May 31, 2011

Rainbow Birthday Invitation

I’m starting to gear up for the next big party around here, Serenity’s 3rd Birthday!  It’s still about six weeks away, but as today is my due date things are going to get crazy around here soon!  I’ve already begun collecting supplies and making lists.  And today, I sent out the invitation!  It wasn’t easy, mostly because I made four different ones that I had to choose from.  Here is the one that I finally decided on, and your first glimpse of the theme!  Rainbows!


And here are the runners-up.  I had lots of inspiration around the web, and switched all the cute polka dots you see everywhere to skittles =)  They are one of Serenity’s favorite candies, and since they have her letter on them they will definitely play a part in the party, although they didn’t make it on the invitation.

If I had gone with this one, I probably would have added the photostrip that I made for the rainbow birthday across the top.  And played with the fonts. =)


Saturday, May 28, 2011

My Garden!


My Garden!

Well, my system for the garden this year is benign neglect =)  I’m sure other people continue to garden at nine months pregnant, but my nesting seems to focus on the inside of the house.  I did have a few successes though!

Early in the year, the tulip bulbs I planted in my cutting garden came up beautifully!  I loved showing Serenity how to cut them (down lower on the stem than when she picks flowers) and put them into water so they live longer. 


The next major excitement was my strawberry patch!  Last year, when I first planted them, I only got maybe a dozen strawberries.  This year we got a huge crop!  Serenity was especially thrilled, and learned quickly to pick just the red ones.  There were plenty of those for her to choose from, I got three or four bowls like this full over several weeks!  She liked them best straight out off the plant though. =)

I was pleasantly surprised that this clematis bloomed beautifully!  I was worried it wouldn’t get enough light, but that’s one experiment that turned out well. 

And now, in my cutting garden, I have a beautiful crop of larkspur and cosmos.  I had the larkspur last year, thanks to my friend Abbey’s mom that sent me lots of seed packets to start my garden.  They make great vase flowers, and they grow so easily!  The cosmos make a nice focal flower, and since they bloomed together I was especially happy that the colors look nice together. =)  I wish the hydrangea was blooming to go with it!  This cutting garden experiment will take a while to iron out! 

I think I’d like to plant something else that Serenity can eat out of the garden, maybe later in the fall.  Any suggestions?  Watermelon?  A pumpkin plant?   

Sunday, May 22, 2011

Pinwheel Pinwheel Spinning Around...


Waaay back when we were in a serious sleep training mode, we bought a mobile for Serenity’s crib that had a remote control option.  It didn’t really help her sleep but it sure beat having to wind up the mobile all the time.  It was fish themed though which really doesn’t go with my storybook/Curious George plans for this baby.  So I made something to replace the fish!  Pinwheels!  These are all over the place now, and so easy to make.  I just used the fast2fuse because that’s what I had out, although a lighter weight fusible interfacing would probably have been better.  This worked though and I was in a “get it done” mood.  Strange what the doctor telling you, he could come any day now, does to your brain. =)  Then you just cut along the diagonals slightly past halfway from the corner toward the middle, and fold up every other side to the middle.  Easy peasy!  And I think it will be cute once it’s installed!  I made a six inch, a 5.5 inch, and a 5 inch pinwheel... mostly because that is the size I could get from my remnants of interfacing. =) 


Friday, May 20, 2011

Kites for the Nursery!


Baby Project Day!

Thanks to my very sweet sister I got a nice long craft time today!  While Serenity was off having a play day with her cousins, I finally made the kites and pinwheels for the new baby’s decorations!  I probably won’t install them until the room is 100% done, but at least I know now which room it will be!  Makes it so much easier to feel like working on things when I can finally visualize how it will work!


Here are the kites I made!  I used fast2fuse, which is a two sided interfacing that is thick enough to have a little weight.  That way it won’t flop too much up there, and I won’t have to make poles or anything like that to give it structure.  Basically I just sewed up 6.5 by 11.5 rectangles to 6.5 inch squares, and then ironed it onto the fast2fuse.  (It took forever to iron because I had to use a press cloth, both because my iron is a little sticky from an unfortunate felt ironing incident, and because I was using minkee.  After that, I cut the fabric to fit the kite shape (16 inches tall, 11 inches wide, 5.5 inches from the top to the center of the diamond.) 

Then I used twine and scraps of fleece and fabric for the tail!  I love it and I’m so excited to hang it!  Hopefully with some nice vinyl letters…  oh yes did I mention I ordered a SILHOUETTE!?!  Sooo excited!

Thursday, May 19, 2011

Where to hang...


Where to hang, where to hang...  The crazy mosaic is either going over the couch, or over the desk.  The other spot will get this painting I bought at bed bath and beyond.  (Sorry for not staging this any better, I have let the cleaning go for a few days as I finished up these art projects.  I'm going to clean like a whirlwind, just as soon as I leave the computer though!  So what do you think?

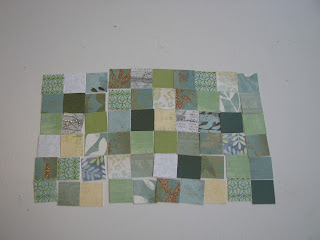
Art Mosaic… or the most tedious project ever =)


Well, I suppose going into it I knew that gluing down more than a thousand one inch squares was going to be time consuming.  The real problem was that I didn’t stick with it when I first got the inspiration from Remodelholic… oh about eight months ago =)  There isn’t a good scrapbook store in my area, and I just wasn’t content with what I found at the chain stores… so it took me months to collect the paper. 

Then, I sat down to cut out squares…  which took a long time by itself.  Then I did a sample to try and decide which one I liked best… eventually I decided I preferred it to have almost no patterned paper, just the watercolory ones and solid ones.  But I dithered so long I lost the momentum.  So the paper sat in baggies for a few more weeks…

Less Patterns

Least Patterns

Most Patterns

less patterns, more blue

And then, the gluing.  Which I did during the day a little, but Serenity really wanted to help.  It was a blast, with her gluing collages while I glued my squares, but she didn’t want to keep doing it as long as I needed to =)  And, sitting in one place isn’t exactly easy on the joints right now at 38 weeks.  So, this might be a great project for someone with a little more focus than me =)  And hey, didn’t it turn out nice?  So it probably goes in the “never again” file… who needs more than one giant Pottery Barn inspired mosaic?  Give me a few months and maybe I’d consider it =)  Now I just need to hang it… unfortunately not a job I can do myself!  I see more procrastinating in my future.

Monday, May 16, 2011

Attic Construction Continues... flooring nightmare!


Our current challenge with the new room is the floor.  We bought locking bamboo from Lowes, in a nice dark color called Jacobean.  It says: no nails, no glue, easy installation.  Well, I wouldn’t say it was easy!  The instructions it came with were a bit on the vague side.  Luckily, my brother Don had used the same flooring in his own house and had great tips!  And Eric(my husband) was willing to work on it to prevent his very pregnant wife from going crazy with her inability to nest.  He got about half of the floor in today, with me helping click them into place after he got it all sawed and lined out.  I think the key is not to get angry and pound too hard on the boards, which breaks the little groove thing.  After a while you really do get a feel for it!  And then you get to a doorjamb and cry a little bit.  Here’s what we learned about the bamboo:

1.)    Put the entire long row together before trying to click it in to the previous row (all the short sides connect, then take the long row you created to put it into the previous row.)
2.)    Buy the tapping block, you don’t want to be pounding directly on the groove, it breaks the little wood bits and if you get anything down inside those grooves, it won’t go together right.
3.)    Don used scrap pieces of the floor, turned upside down and stuck under the edge that you aren’t clicking to hold it at the correct angle while tapping in the row.  It definitely helped! 
4.)    Sometimes creative solutions are needed for edges and doorjambs that you can’t angle into place.  I’m not sure that I would recommend what we did, but I’ll tell you in case you get as desperate as we were.  On the piece that slid under the doorjamb, we left one piece off the far end, and used the tapping block to tap that whole row under the doorjamb.  Then we took the last piece and chiseled the lip off the tongue on the side, so that we could just slide and tap the piece into place without angling.  It worked…  and it was just cheating a little bit I hope.  Once the next row is firmly in place I think it will be fine to have one unlocked piece right in the middle.  I hope. =) 
5.)    We had a plunge saw to saw back the doorjamb, and it was sooo nice. 
6.)    We’re just halfway, but we took it very easy today.  And this is a room with crazy angles, a square one would be much simpler!   


Sunday, May 15, 2011

DIY Attic Playroom


My dad, the builder of the fantastic hideaway for Serenity’s bedroom, has been converting our attic into a playspace/storage area (or possibly a nursery for the new baby, we still haven’t decided and he’ll be here in two weeks!!!)  Dad has done an amazing job with a very strange space!  The ceilings are angled, nothing was square, all designed to drive a person crazy =)  He put in plywood flooring, built walls, added insulation, and put up all the sheet rock!  We had some guys come in to mud, but other than that, he did it all!  It turned into a great space, with fun little nooks and lots of storage areas.  Oh, and one side has the new heater/ac unit that we had put in so that our house is zoned!  It is SO nice already.  Before the upstairs was always too hot, and the old unit had to work all the time to try and cool it.  And at the same time, the downstairs was cold.  Now it’s all just right, and much more energy efficient!  I didn’t get many along the way pictures because I couldn’t climb up the ladder into the attic, so until he cut the door I didn’t get any!  And then I was preoccupied keeping Serenity away from the construction zone.  But before, it was just rafters and beams, rickety flooring, and nails coming through the ceiling from the roofing!  And now it’s a great space with lots of potential fun!!! 

We cut a hole in the wall of Serenity's former bedroom to reach the attic behind it.  We had to have the wall on the left because of where the ductwork is, but once you walk past that it opens up into a great space!  I think I like it this way, makes it seem more like an adventure =) 

I love all the angles, although they drove Dad crazy to work with!

Behind this door is the new heater, but I think this corner would make a great little reading nook!


Saturday, May 14, 2011

Baby Boy Quilt with Kites and Pinwheels!

 I can't believe I'm due in two weeks and I've just now finished a baby quilt for my baby boy!  Just barely in time, and I have several more things on my list to do for him!  But at least he has something his Mama and Grandma made. =)  I suffered from a lot of indecision and construction woes, but now it's done!
  I used the adorable Dr. Seuss fabrics they have available right now, and I love how colorful and fun it turned out!  Just a simple flying goose pinwheel, with a kite appliqued to the back


The overall nursery theme will still be storybook, just like Serenity's which I wrote about here and here, because I still want to use the ABC Storybook art I used, but I plan to make some special things for him, particularly with Curious George!!!  BUT, the room isn't done, so that may have to wait until he's born.  He'll be in a cradle in our room at first anyway. =) 

Saturday, May 7, 2011

Blue Room Complete!

I finally finished the last few details on the blue room, including filling all those frames!  I thought it would take longer, yay for nesting I suppose!  I do have a few placeholders because I didn't want to fill everything before the baby boy gets here, so his ultrasound pics are in one and one shadowbox just has some fabric in it.  But it looks finished =)


I also covered the piano bench.  As a reminder, it used to be a golden yellowy color...  
And now it's blue!
Yeah, ignore the sun pillow.  It's a key part of my pillow tower that my eighth month of pregnancy seems to require, I didn't even notice it when I was taking this pic!  It was a very simple re-upholstery job, I just took off the yellow fabric and added the blue, reusing the old foam as it was fine.  I didn't tuft it, although I may go back and do it later.  I wanted to see how I liked it flat for a while.  Reattaching the seat by myself was the hardest part, but I was determined to earn that checkmark!!!

And the final detail, which I have wanted for SO long, a capiz chandelier!  I got mine from pottery barn teen and I love it!  It gives such a nice light for reading, and I like the sound of capiz shells if I open the window for a breeze too!  Perfect for my little reading nook.  


hmmm, probably should deal with that cord eh? 

Tuesday, May 3, 2011

Mother's Day Traditions

I've been seeing lots of Mother's Day posts and it made me want to share mine!  It's pretty simple, but every year on Mother's Day we take family pictures.  We started when I was pregnant with my daughter, Serenity.


And here we are after she's born :


I'm very excited because this year we splurged on an actual photographer, thanks to a Groupon deal!  They won't be ready till mid-May, but since I'm eight months pregnant getting good pictures ourselves would have been extra challenging =) 

We also do this on Father's Day, but the pictures are a little less traditional to suit my husband better =)